
|
Classic CanAm |
|
Early
MX and TNT Fuel Tank Restoration |
It
is no secret that Can-Am gas tanks fade, turn yellow, and tend to lose their
decals as they age. This is I have received some good advice from others, and this is what I have found that has worked well for me. I have done ~ 5 tanks now, and they all came out beautiful. 1. Remove Petcock, tank mounting hardware, and gas cap.
2. Wash tank with Purple cleaner, like Castrol Super-Clean, both inside and out. I use a Scotch-Brite scuff-pad to really rough up the pores, using the cleaner and rinse out very well with water from the garden hose. It is advisable to use rubber gloves, as this cleaner sure can dry out your hands. If there is varnished old fuel in the tank, an Automotive Grade Acrylic Lacquer Thinner or Acetone should be pored inside the tank to loosen these deposits up. I shake the tank vigorously to ensure all deposits are loosened, and then empty the solvent from the tank into a plastic container.
3.
I now wash the outside of the tank with Acrylic Lacquer Thinner, or Acetone. I
use a parts brush in a large plastic container. What was left over from the
above procedure should work fine. This is to remove most of the
4. The tank should now be flushed with soapy water, both inside and outside, and repeatedly rinsed with clean water.
5. It is now time to sand the tank. I use an orbital auto body sander called a DA (dual action sander) and start with 80 grit on the deep scratches and gouges, if there are any present, as well as to remove the old decals on the sides. I then take 180 or 220 grit on the DA and do the rest of the tank, as well as go over the regions which were sanded by the 80 grit, in an effort at minimizing the scratches. Try to keep the sander flat at all times.
6. A Scotch Brite scuff-pad is then used on all of the edges, the undersides, and any areas missed by the sander, to promote adhesion for the top coating process.
7. The tank should now be blown off with compressed air, and then washed again with soap and water, both inside and out, and thoroughly rinsed and allowed to dry.
8. The tank should now be ready for top coating. I wipe the tank down with Automotive Grade Wax and Grease Remover and use a tack cloth (automotive grade) to remove dust particles.
9. A product that I highly recommended, for promoting adhesion to plastic parts, and definitely works very well is Sherwin Williams # UPO7227 Adhesion Promoter. This is available in an aerosol spray can as well as quart cans. The adhesion promoter should now be applied. I apply 1-2 wet coats, and let dry for ~ 30 minutes. I was able to do 4 tanks with one 16 oz. aerosol can
10. You are now ready for the priming process. I used a Flex-Primer manufactured by SEM. It is available in quarts, and possibly aerosol as well. It is SEM # 39134 and is called Flexible Primer/Surfacer. This is a great product, and builds very nicely. It can also be sanded after 45 minutes. I apply at least 2 heavy coats, let dry, then wet-sand using 220 grit wet/dry.
11. The tank should now be thoroughly rinsed and dried. Apply another 1-2 good coats of SEM # 39134 Flex-Primer. Let set-up (dry) then wet sand using 400 grit. Thoroughly rinse again, and assess your work. It is possible that the tank may need another application. If so, repeat as necessary, final sanding with 400 wet. When finished, rinse tank again thoroughly, both inside and out, and let dry. On my original MX-3 fenders, I had to perform the priming/filling process three (3) times to remove all of the scratches, as one of the fenders was really bad to begin with.
12. You are now ready for top coating. Make sure the tank is completely dry, and remove any oils from handling with your hands, using wax and grease remover. Just wipe lightly and use sparingly so as to not saturate the current layers you have finished thus far. Now wipe using a tack cloth to remove dust.
13.
Any places on the tank where bare plastic is showing, where the SEM primer has
been sanded through,
14. Allow to dry, and tack dust again using tack cloth, now the color is applied.
15. I have always had very good success using Sherwin Williams Automotive Finishes. I use Sherwin Williams Acrylic Enamel with hardener. The MX-1 and 2 tanks are white, as are the TNT tanks for these year models; thus, the shade of white that you select is entirely up to you. I selected a more pure white for my tank restorations, like GM color code # 10, as this more closely matches the whites used on the reproduction tank decals that are currently available from folks like Al Roberts. For my MX-3, I used Acrylic Enamel again, and Black is Black, so there is no color or shade conflict here.
16. The Sherwin Williams Acrylic Enamel should now be mixed as stated on the can, using 8 parts color, 4 parts reducer, and 1 part hardener (catalyst). The following additive should also be added - Sherwin Williams Multi-Flex Flex Additive # V6-V299. Two parts should be added to the mixed paint. Ensure you are using an OSHA approved paint mask, as the mixed paint contains volatile chemicals, including Poly-Isocyanides.
17. I generally apply 3-4 good coats to ensure full coverage, obviously allowing the paint to flash between coats, to minimize sags (runs).
18. The paint should be allowed to dry completely. I generally wait ~ 2 4 weeks, and then apply the decals. The tank can be washed and waxed, and cared for like any automotive finish, but waxing should be done after ~ 4 weeks time, so any remaining vapors may be allowed to escape through the paint pores.
I hope this helps folks trying to keep their Can-Am tanks like new. This will also work for other Plastic Can-Am tanks, as well as other plastic motorcycle tanks, and fenders as well..
No, I do not work for Sherwin Williams, and I am not affiliated in any way with them. I am just an Engineer, who has used their products and has had very good success using them.
Good Luck
Edward Pinzel Clearwater, Florida spooling at stage1.net spooling_v6 at hotmail.com '76 MX-2 250cc Prototype Machine '77 MX-3 250cc Production Machine |
If you have a query or information about Can-Am motorcycles please contact us
 believed to happen as a result of fuel being kept
in the tank, and the vapors trying to escape through the plastic pores of the
fuel tank.
believed to happen as a result of fuel being kept
in the tank, and the vapors trying to escape through the plastic pores of the
fuel tank.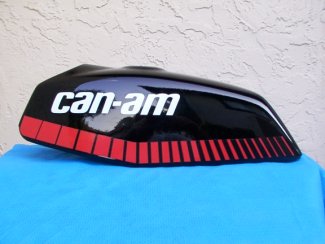 old decals and
adhesives, as well as any remaining grease/grime in the plastic pores.
old decals and
adhesives, as well as any remaining grease/grime in the plastic pores.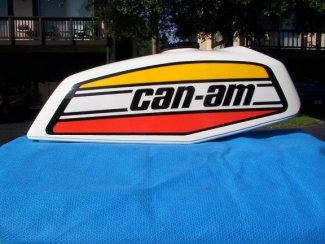 should be covered lightly with the Sherwin Williams #
UPO7227 Adhesion Promoter. There is no need to cover the entire tank again
with the adhesion promoter, but it will not hurt if you do.
should be covered lightly with the Sherwin Williams #
UPO7227 Adhesion Promoter. There is no need to cover the entire tank again
with the adhesion promoter, but it will not hurt if you do.