
| Classic CanAm | |
Technical Tips &
Fixes |
|
 |
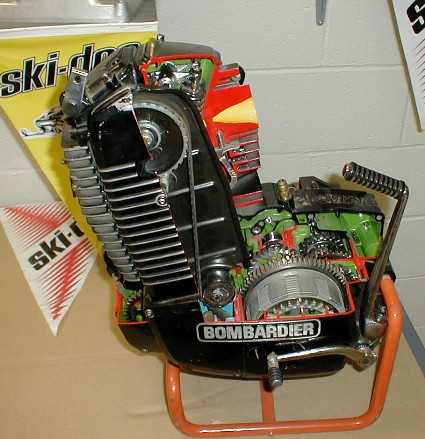 |
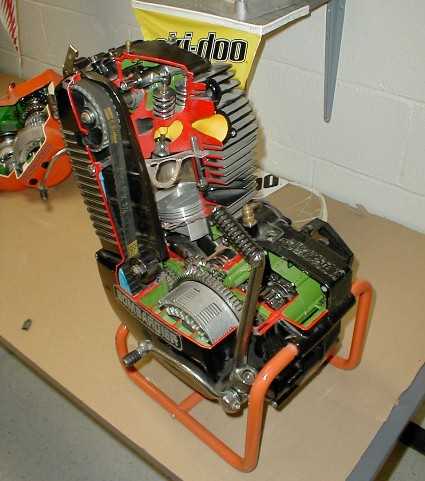
| Special thanks to Dan Barnhill for cutaway
Sonic photos (click on image for larger view) |
|
|
||||||||||||||
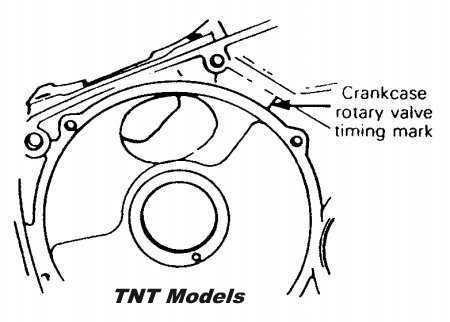
Rotary Valve Alignment -- TNT &
Qualifier (symmetrical valve) |
||||||||||||||
 |
||||||||||||||
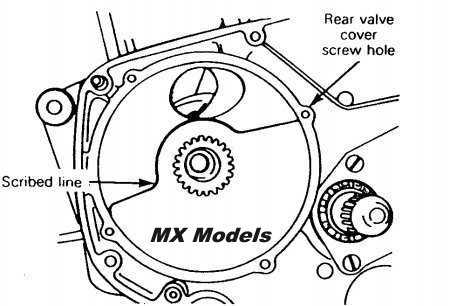
Rotary Valve Alignment -- MX Models
(Asymmetrical) |
||||||||||||||
 |
||||||||||||||
Leaky
Petcocks The second way to eliminate the problem is to use the 2 position valve found on the MX-3. It costs more than a gasket kit, but the valve is designed better. If you're racing vintage motocross you don't need a reserve anyway. Tech Tip submitted by Fred Brown 1979 to 1981 Petcock Grommets Clutch
Slippage Clutch
Drag or Stiffness Clutch
Cover Leaks First, you will want to replace the kickstarter seal in the cover. Do this even if it's not leaking yet. You can take the old seal to a bearing house to have it matched up, or better yet, just order one from Tony Murphy Rotax or any of the other suppliers I have listed in the parts sources section. They are only about $5 and this is the best time to replace it. Make sure you grease up the seal before putting the cover back on. Clean the matting surface on the engine and clutch cover with brake cleaner or acetone. If your CanAm has oil injection be careful not to lose the small o-rings that connect the oil galleys between the cases. Apply a small bead of silicone around the entire clutch cover sealing surface, taking care not to get too much around the oil galley near the bottom of the cover. If you apply too much goop it will squish into the oil galley and block lubrication to the main bearing. Re-install the cover and tighten the screws. The silicon will squish out and look goofy but don't worry. After it dries just grab one end and peel off the excess. Let the silicon set-up for about 24 hours before putting oil in the gearbox. Removing the
"Sponge" from the Oil Injection Reservoir Here's a tip on removing the baffle from Al Roberts in Texas I drain the oil then I take the bike to a car wash. With the "bolt" out of the bottom, put the wand in the top with the setting on soap and spray. The soap takes the oil out and the water pressure breaks whatever is left of the sponge into pieces which come out the hole in the bottom and the fill hole in the top. I keep the wand in the top hole until I see no more sponge. I then put the setting on rinse and continue until the water coming out of the bottom hole is clear. To be sure that all of the sponge is out of the tube, I "blow the tube out" with my air-compressor. This also gets out any water that is left. I then, to make sure, use my shop-vac. This is very thorough and the tube is clean. I have used this method on four bikes so far and it works great. If you are restoring a bike and it is going to be a little while before you are ready to put oil back in the tube, put a 10mm bolt in the bottom and fill the tube with transmission fluid. This will keep the inside of the tube from rusting. When it comes time to put the bike back together, the thin fluid drains easily, and any left will mix OK with 2-cycle oil and burn. Another Baffling tip from "Scott" Hi Mike I have a tip on the oil reservoir baffle. On many of the bikes I have worked on the baffle is still intact. In this instance I find drilling a small hole (3/16) in the back of the reservoir is the best fix. This allows you to push the foam out in one chunk. Rinse the reservoir out to make sure you got it all and weld up the hole and grind down the weld. I've done this on several restorations and it is not noticeable after paint. Great site you've got I use it everyday. Scott - posted 3/4/2006 Broken
Kickstarter Hubs Here's a kickstarter tip from Paul Kalika in Austrailia: I've found that when the kickstarter pivot is a bit worn, any grit causes it to jam, usually at an inconvenient time. I've started slipping a cut length of a BMX inner tube down the kickstart lever and stretched over the knuckle, with a cable tie closing off the loose upper end of the sleeve. Since I've been doing this, I've had no drama's and as the lever pivots smoothly the shaft spline is getting an easier time of it too. Simple and cheap. I changed
my transmission oil. Now my kickstarter makes a ratcheting sound when the engine is
running.
Did you use a 17mm wrench to change the oil? Did you also hear a snapping
sound when you took the bolt out? You doofus! You took out the kickstarter retaining
bolt (don't feel too bad, lots of people email me about this problem). I've heard
rumors that you can remove the bolt again and rewind the kickstarter spring without taking
the motor apart, but I've never done it. Probably because I know the difference
between a 17mm socket and a 6mm allen wrench. Here's a letter from a viewer that might
help you out: If that doesn't work Broken Countershaft and Chain Guard Another CanAm engineering marvel is the horseshoe shaped chain guard that surrounds the countershaft sprocket. Take it off. I'm sure it was invented by the same engineer that came up the foam sponge in the oil reservoir. It's supposed to protect the timing cover from damage in the event you throw a chain. I've never seen a damaged timing cover, but I've seen a number of broken countershafts and cracked engine cases as the result of a thrown chain getting jammed between the sprocket and the guard. Even if you throw a chain and somehow end up breaking a timing cover, it's much less expensive than engine cases or a countershaft -- and it's much easier to fix. Removing the
Oil Injection System Rotax engineers were smart people. They borrowed the automatic lubrication system idea from the Bombardier snowmobile motors (the largest manufacturer fo snowmobiles and watercraft in the world). Although there are a few areas that could have stood a little extra thought (such as the routing of the clutch cable) the engine is built to be run as designed. The right side of the crankshaft utilizes an "oil slinger" to insure proper lubrication of the main bearing. The slinger is a large washer with a nipple that fits into the crank. It takes the oil from the galley and forces it into the bearing. The flip side is that it acts as a barrier if you decide to premix. What happens when you eliminate the oil pump without proper engine modification is that the right side main bearing will prematurely wear from oil starvation. If it seizes and spins, you bought yourself a new set of engine cases. If it wears and gets sloppy you will find that the flywheel starts to hit the ignition stator during operation and destroys the stator (along with the flywheel). There should be NO detectable play in the right side engine bearing. To do the job right requires complete disassembly of the engine. You must remove the right side main bearing from the crank to access the slinger. Then you need to fabricate a spacer of the exact same thickness but of smaller outside diameter (would look like a big washer). This allows oil to get between the crank half and the bearing. But to provide the premixed fuel a path, a 1/8" hole has to be drilled in the right side transfer port of the cases (there are bulletins from the factory on this procedure which I will try to make available in the future). However, you can see how the hole is positioned by looking at the left side transfer port which most engines have from the factory. The last thing necessary is to make a small plate to cover the hole in the clutch cover where the oil pump used to be located to prevent loss of transmission fluid. You can seal the plate to the cover with a good sealant such as Permatex or Locktite 505. Our Classic CanAm racing team uses both methods of lubrication on our 4 motorcycles. Fred Brown prefers premix, and I run the oil pump on the bikes I maintain for Jim Atkins. The MX-2 bikes used a lock tab instead of a split cable, which is how Jim's bikes are setup. When you use a split cable the pump is regulated by both throttle position and engine RPM. But the lock tab eliminates the need for a split cable and holds the requlator about 3/4 full on. The biggest disadvantage to this setup is that Jim's bikes will smoke like a chimney from excess lubrication when he has to sit at the starting line for more than about 60 seconds. I hadn't noticed this until watching some home videos of various races and now instruct Jim to wait until the last minute before starting the bike to minimize this problem. Although the delay makes him a bit nervous, our CanAms always start within one or two kicks. But to substantiate my position, I recently inspected the top end off Jim's 125 and found virtually no signs of wear after 20 motos and two 45 minute GP races. This is due not only to the forced lubrication but also the modern synthetic oils (we run Castrol full synthetic 2 cycle oil). As I stated earlier, the best method of lubrication is highly subjective. It's important that CanAm owners utilize whichever method makes them most comfortable. But please make sure to do it right. Intermittent Richening of Bing Carb This section applies to the Bing carbs with a "choke lever." I ran into a problem with our vintage race bikes that baffled me for some time. On the 125 I'd get the jetting dialed in perfectly and then for no apparent reason the bike would run extremely rich the next time we started it. This was very frustrating because I'd dial it in at home and the morning of the race it would suddenly start to load up and run rich. Well meaning people would come by and tell me I needed to rejet. But a jet doesn't change it's properties overnight, and neither does the density of air at the same altitude. I initally figured it to be the float needle, although it showed now signs of wear under magnification. But then I noticed that the plunger (the piston that goes inside the carb and attaches to the choke lever) had a rubber insert in the bottom. This piece on our carb showed very slight signs of wear under magnification. I called Bing International and the technician immediately told me to order a new plunger ($12) and the problem was solved. When I would turn on the choke (actually a richening device) to start the cold motor, the aged rubber didn't always seal completely when I turned it back off. TNT
Battery Fix Submitted by Ed Tobin |
